digitalWrite
In this example, we will blink the LED which is connected to a digital pin (D0 - D13)
API Required:
- public Arduino();
- public void pinMode(int pin, byte mode);
- public void digitalWrite(int pin, byte value);
Hardware Required:
- LattePanda x 1
- LED x 1 (or you can use the LED attached to pin 13 on the Arduino board itself)
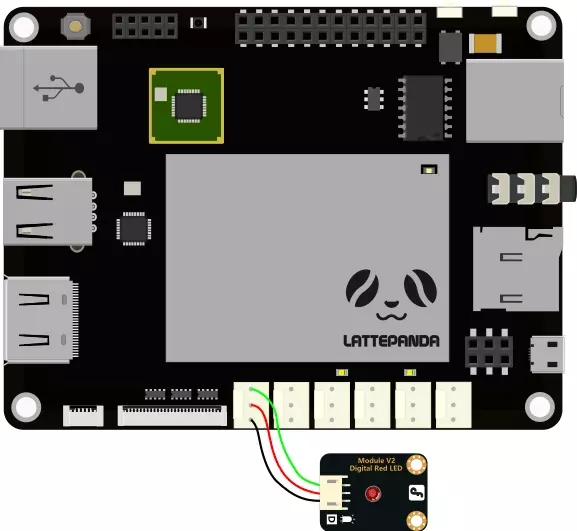
Circuit:
- Insert LED directly into pin 9
Code:
- Create a new project in Visual Studio. Refer to Create a project to find out how to use Visual Studio for Arduino Projects.
- Main function code :
using System;
using System.Collections.Generic;
using System.Linq;
using System.Text;
using System.Threading.Tasks;
using System.Threading;
using LattePanda.Firmata;
namespace blinkYourBoard//project name
{
class Program
{
static Arduino arduino = new Arduino();//create an instance and initialize with the default parameters
static void Main(string[] args)
{
arduino.pinMode(9, Arduino.OUTPUT);//Set the digital pin 9 as output
while (true)
{
// ==== set the led on or off
arduino.digitalWrite(9, Arduino.HIGH);//set the LED on
Thread.Sleep(1000);//delay a seconds
arduino.digitalWrite(9, Arduino.LOW);//set the LED off
Thread.Sleep(1000);//delay a seconds
}
}
}
}
Test:
- Click Debug button to execute, the LED will start blinking.
digitalRead
This example detects the Button state using the information sent through a digital pin (D0-D13). API required:
- public Arduino();
- public void pinMode(int pin, byte mode);
- public int digitalRead(int pin);
Hardware Required:
- LattePanda x 1
- Button x 1
- Resistor (with any resistance value greater than 1KΩ) x 1
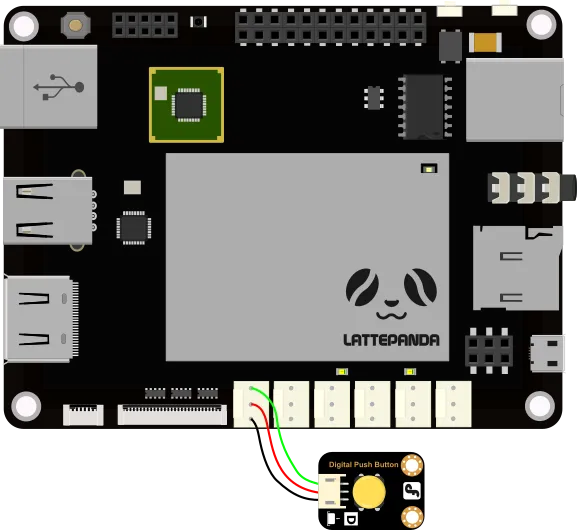
Circuit:
- Connect the button to pin 9 in the same way as shown in the figure below
Code:
- Create a new project in Visual Studio. Refer to Create a project to find out how to use Visual Studio for Arduino Projects.
- Main function code :
using System;
using System.Collections.Generic;
using System.Linq;
using System.Text;
using System.Threading.Tasks;
using System.Threading;
using LattePanda.Firmata;
namespace buttonDemo//your project name
{
class Program
{
static Arduino arduino = new Arduino();//create an instance and initialize with the default parameters
static void Main(string[] args)
{
arduino.pinMode(9, Arduino.INPUT);// Set the digital pin 9 as input
int Value = arduino.digitalRead(9);// Read the state of pin 9 once.
Console.WriteLine(Value);
arduino.digitalPinUpdated += Arduino_digitalPinUpdated;//
Add Event Listeners and call it when the digital input update.
}
private static void Arduino_digitalPinUpdated(byte pin, byte state)
{
Console.WriteLine(pin);
Console.WriteLine(state);
}
}
}
PWM
This example assigns a pulse width modulation (PWM) value to an output pin (D3, D5, D6, D9, D10, D11) to dim or brighten an LED API Required:
- public Arduino();
- public void pinMode(int pin, byte mode);
- public void analogWrite(int pin, int state);
Hardware Required:
- LattePanda x 1
- LED x 1
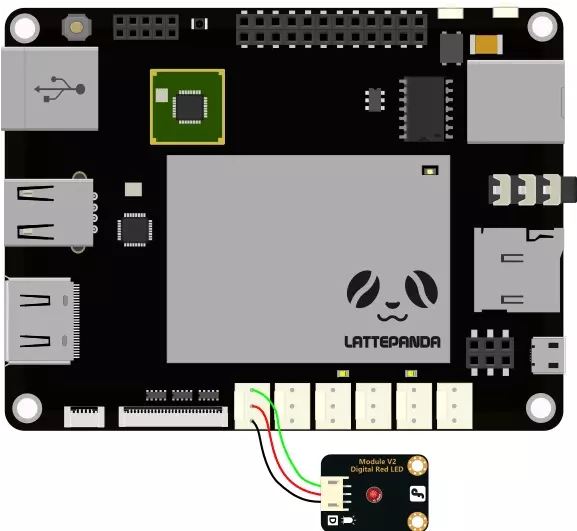
Circuit:
- Connect the LED directly into pin 9 in the same way as shown in the figure below
Code:
- Create a new project in Visual Studio. Refer to Create a project to find out how to use Visual Studio for Arduino Projects.
- Main function code :
using System;
using System.Collections.Generic;
using System.Linq;
using System.Text;
using System.Threading.Tasks;
using System.Threading;
using LattePanda.Firmata;
namespace analogWriteExample
{
class Program
{
static Arduino arduino = new Arduino();//create an instance and initialize with the default parameters
static void Main(string[] args)
{
arduino.pinMode(9, Arduino.PWM);
while (true)
{
for (int i = 0; i <= 255; i++)
{
arduino.analogWrite(9, i);
Thread.Sleep(4);//delay 4ms
}
for (int i = 255; i >= 0; i--)
{
arduino.analogWrite(9, i);
Thread.Sleep(4);//delay 4ms
}
}
}
}
}
- Click Debug to execute, and then you will find the LED brightness will vary form dim to bright, and then back again.
AnalogRead
This example detects the value from an analog pin (A0-A5) where a potentiometer is connected, and then prints out said value API Required:
- public Arduino();
- public int analogRead(int pin);
- public event AnalogPinUpdated analogPinUpdated;
Hardware Required:
- LattePanda x 1
- Potentiometer x 1
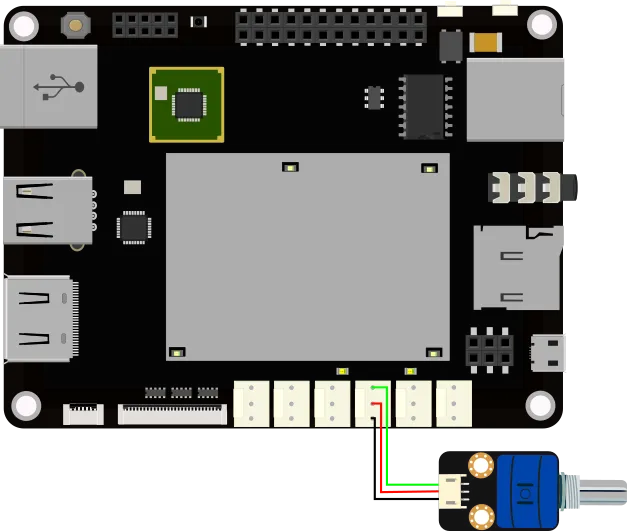
Circuit:
- Connect the potentiometer to pin 0 in the same way as shown in the figure below:
Code :
- Create a new project in Visual Studio. Refer to Create a project to find out how to use Visual Studio for Arduino Projects.
- Main function Code :
using System;
using System.Collections.Generic;
using System.Linq;
using System.Text;
using System.Threading.Tasks;
using System.Threading;
using LattePanda.Firmata;
namespace analogWriteExample
{
class Program
{
static Arduino arduino = new Arduino();//create an instance and initialize with the default parameters
static void Main(string[] args)
{
int Value = arduino.analogRead(0);//Read the state of pin 0
Console.WriteLine(Value);
arduino.analogPinUpdated += Arduino_analogPinUpdated; ;//Add Event Listeners and call it when the analog input update.
}
private static void Arduino_analogPinUpdated(int pin, int value)
{
if(pin==0)
{
Console.WriteLine(pin);
Console.WriteLine(value);
}
}
}
}
Test:
- Click Debug to execute, and then observe how the state of the potentiometer will begin printing readouts when you rotate it.
Servo
In this example, we will sweep the servo motor back and forth across 180 degrees. API Required:
- public Arduino();
- public void pinMode(int pin, byte mode);
- public void servoWrite(int pin, int angle);
Hardware Required:
- LattePanda x 1
- Servo Motor x 1
Circuit:
- Insert the Servo Motor directly into pin D9:

Code :
- Create a new project in Visual Studio. Refer to Create a project to find out how to use Visual Studio for Arduino Projects.
- Main function code :
using System;
using System.Collections.Generic;
using System.Linq;
using System.Text;
using System.Threading.Tasks;
using System.Threading;
using LattePanda.Firmata;
namespace analogWriteExample
{
class Program
{
static Arduino arduino = new Arduino();//create an instance and initialize with the default parameters
static void Main(string[] args)
{
arduino.pinMode(9, Arduino.SERVO);
while (true)
{
arduino.servoWrite(9, 180);//tell the servo motor go to the position in 180 degrees
Thread.Sleep(1000);//delay a seconds
arduino.servoWrite(9, 0);//tell the servo motor go to the position in 0 degrees
Thread.Sleep(1000);//delay a seconds
}
}
}
}
Test:
- Click debug to execute, and then you will find that the motor stars to sweep back and forth continuously.
I2C
This example will show you how to use I2C to receive data form a 3-axis accelerometer ADXL345 API Required:
- public Arduino();
- public void wireBegin(Int16 delay); 3.public void wireRequest(byte slaveAddress,Int16 slaveRegister, Int16[] data,byte mode);
- public event DidI2CDataReveive didI2CDataReveive;
Hardware Required:
- LattePanda x 1
- ADXL345 x 1
Circuit:
- The following is a figure displaying which pins on the LattePanda should be connected to their corresponding pins on the accelerometer.

Code :
- Create a new project in Visual Studio. Refer to Create a project to find out how to use Visual Studio for Arduino Projects.
- Main function code :
using System;
using System.Collections.Generic;
using System.Linq;
using System.Text;
using System.Threading.Tasks;
using System.Threading;
using LattePanda.Firmata;
namespace analogWriteExample
{
class Program
{
static Arduino arduino = new Arduino();//create an instance and initialize with the default parameters
static void Main(string[] args)
{
arduino.wireBegin(200);
arduino.wireRequest(0x53, 0x2D, new Int16[] { 8 }, Arduino.I2C_MODE_WRITE);//Write data{8} to I2C
arduino.didI2CDataReveive += Arduino_didI2CDataReveive;//did I2C Data Reveive
arduino.wireRequest(0x53, 0x32, new Int16[] { 6 }, Arduino.I2C_MODE_READ_CONTINUOUSLY);//Read data form I2C data
}
private static void Arduino_didI2CDataReveive(byte address, byte register, byte[] data)
{
Console.WriteLine(BitConverter.ToInt16(data, 0));
Console.WriteLine(BitConverter.ToInt16(data, 2));
Console.WriteLine(BitConverter.ToInt16(data, 4));
}
}
}
Test:
- Click Debug to execute, and then the 3-axis acceleration data will be printing out continuously.