Power on Device
Background
To power your LattePanda 1st gen product, there are two different power source interfaces. The first one is the commonly used micro USB port. The other one is any one of the 5V GND (ground) pins, which are all labeled "CN2 Header Pins" on the board.
- The MicroUSB port is more appropriate for desktop development scenarios.
- The CN2 Header Pin is a good power source for embedded applications, which have limited space yet provide a stabler, stronger power source (with higher amperage to feed enough current for sensing the system simultaneously, at about 3~4 Amps) for the system.
- The current necessary for a LattePanda with a full computational load is about 1.6 Amp. However, when booting the system, the peak current required is about 2 Amp.
Hardware Required
- USB Wall Adapter with up to 2A Output
- Quality MicroUSB Cable (capable of supplying 2A current)
- HDMI Cable
- Heatsink or Active Cooling Fan (recommended)
Other General Purpose PC Peripherals
- Monitor with HDMI Port or MIPI Displays from LattePanda
- Keyboard and Mouse (if you have a touch display, you can also use the Windows Ease of Access keyboard which already comes with the Windows operating system pre-installed on your device)
Note
We've noticed that there are many fake USB adapters and low-quality cables in the market which cannot provide up to 2A of current (even though they may be listed as a "2A" cable). In our experience, this problem often causes the user to be unable to boot the device properly the first time. We ask you to please check the cables carefully before you buy. Should you experience any problems, we suggest trying another adapter or cable in the event that the device still boots unsuccessfully.
A power adapter will not be bundled with the board, but you can find them on our online store, amazon, or any other electronics retailer. LattePanda also released an officially endorsed (US Standard/EU Standard) adapter and MicroUSB cable to make sure that you can start your hands-on experience with the device without any difficulties.
Also, here’s a list of LattePanda-tested adapters and cables available from Amazon. We measured the max output of every adapter listed using professional tools. For testing cables, we tested maximum current-supplying capability. We even cut the cables to measure the diameter of the metal wire, which determines the maximum current load of the cable. This list is provided as a reference as you choose which power supply and cable to buy.
Booting the Device
Once you have everything ready, please follow these simple instructions below to get started.
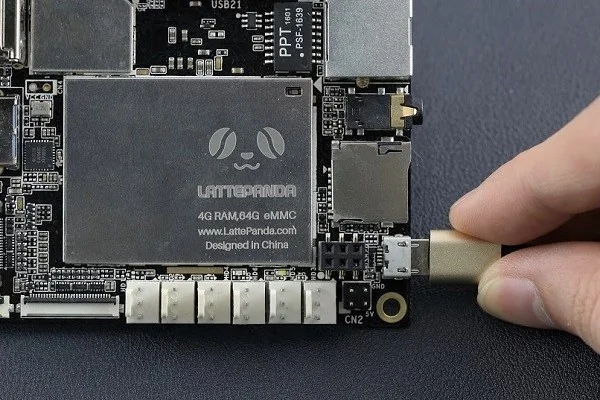
1.Connect the USB into the USB power adapter, and then insert the microUSB into the micro USB port of the LattePanda (The micro USB port is located next to the SD card socket).
2.When plugged in, you should see the red LED indicator light up on the underside of the board. This means that the LattePanda is initializing. Wait patiently for a few seconds until the LED light goes out.
Warning
Do not unplug the power cable while the system is running. If the red LED is on, this indicates that the is system is running.
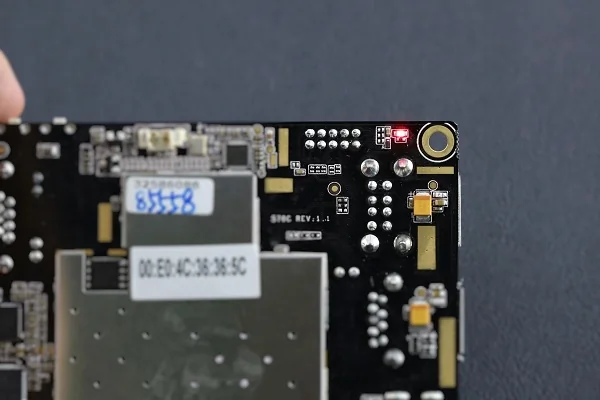
3.When the LED indicator turns off, press and hold the power button for one second to turn on the LattePanda. You should see the LED indicator light up again.
As you can see, this process is just the same as turning on a new computer! Now you can start working!
Other Power Supplies
When you want to power the system with a DC-DC adapter or a DC universal regulated switch power supply, the CN2 pins beside the MicroUSB port will be the best interface for that purpose. Using a barrel jack connector and dupont cables is also a very effective solution.