Powering On
This document describes the different ways you can power on your LattePanda. It will cover the input specification, what you will need, and installation steps.
Overview
3 Ways to Power On Your Delta with Different Applications:
- Official PD adapter that comes with the LattePanda Delta(Recommended)
- External PD power bank
- 12 volt input from JST PH2.0 - 4P connector
Type-C PD Adapters and Power Banks
Input Specification
- Supports PD protocol
- Accepts Power Delivery compliant devices with 45W output (15V3A).
What You Will Need
- USB Type C Power Delivery Adapter or Power Bank
Installation Steps
- Connect the USB Type C adapter to the wall socket.
- Connect the USB Type C connector to the LattePanda Delta USB Type C port.
Recommended Power Banks
- ZMI 20000mAh PD battery.
- More options recommended and tested by ccs_hello (community member).
- Or any other brand of power bank supporting PD protocol with an output of up to 36 watts
JST 4p DC Input Connector
Warning
Please make sure to prevent any problems while powering on the system from incorrectly connecting the positive and negative pins!!! Review your connections again and again before powering on the system.
The voltage range of the Delta's power input connector is 11~15 volts. So, if you're choosing to use the lipo battery, you should use 2~4 cells. The standard DC power source is 2A @ 12 volts. The maximum required booting power is about 10 watts, and operating power is about 3 watts with low electrical loads (with CPU power usage < 5%).
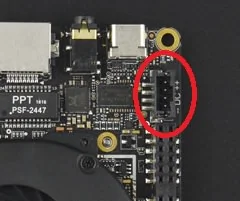
Input Specifications
- 11-15 volts
- Up to 24 watts is recommended
- Standard DC power - 2A @ 12 volts
- JST PH2.0 - 4p connector (pin mapping is marked on the board: -- DC ++, which means two negative pins and two positive pins)
You can check out the details regarding the pinout diagram here.
Related Links
Enjoy your new LattePanda!
Want to play with IoT? Want to study programming? Want to control the physical world? Check the list of tools recommended first!