Display and Touch Connections
This document will review the different ways you can display the screen from your LattePanda. It will also go over what you will need and the installation steps.
Warning
Make sure to ground yourself and get rid of the static electricity on your body before touching your LattePanda SBC board. Failing to ground yourself may cause static electricity discharge into the board components, damaging your LattePanda.
Overview
4 Ways to Extend Your Display on the LattePanda Delta
- HDMI - for standard desktop usage
- Type C to HDMI / DP converter - for standard desktop usage
- Connect to a Macbook Pro or any other development PC via a Streaming Cable - Designed for Developers
- eDP displays - Designed for Embedded Applications
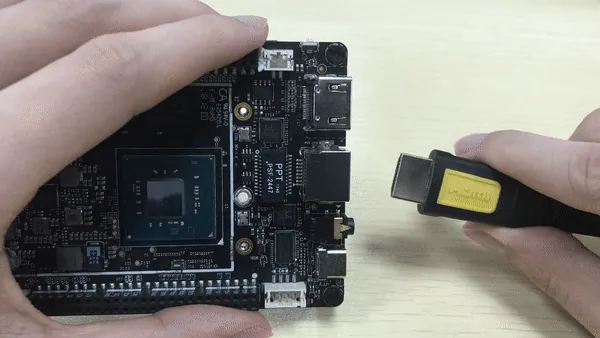
HDMI
What You Will Need
- HDMI cable
- TV or monitor with HDMI port
Installation Steps
- Connect an HDMI cable to the LattePanda HDMI port.
- Connect the other end of the HDMI cable to the TV or monitor.
DP / DVI / VGA
What You Will Need
Note
In order to power on the LattePanda Alpha/Delta with the USB Type C port while using a USB Type C adapter, the adapter must have current in the Power Delivery passing through.
- USB Type C to DVI / VGA / DP adapter or hub
- Display cable (Depending on the adapter type)
Installation Steps
- Connect the USB Type C adapter to the LattePanda Alpha/Delta USB Type C port.
- Connect the display cable (DVI, VGA, DP) to the USB Type C adapter.
- Connect the other end of the display cable to the TV or monitor.
- Connect the USB Type C power supply to the USB Type C adapter.
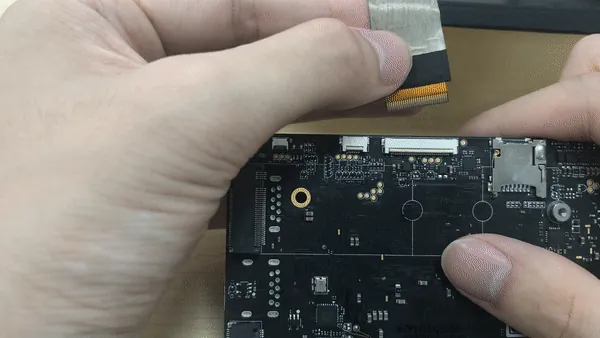
Embedded DisplayPort (eDP)
Note
Using a 3rd party eDP display may not have drivers supported by your computer. In order to use the 3rd party display, it may require the development of a new driver.
What You Will Need
Installation Steps
Warning
Make sure to connect the display before you turn on your LattePanda. Also make sure that the cable is installed correctly before turning the power on. Failure to follow these instructions below may cause a short-circuit and damage the LattePanda or display.
- Make sure the LattePanda is powered off and that the power supply cable is disconnected.
- Open the eDP latch on the LattePanda board.
- Align the eDP cable with the LattePanda cable connector. Make sure the copper cable connection pads face the LattePanda connection pads.
- Connect the eDP cable.
- Press down on the latch to secure the cable.
Additional eDP Displays from the LP Community
While the LattePanda Alpha/Delta eDP display is officially supported by our company, here we have some other displays that our community members have gotten working.
Touch Panel
What You Will Need
Warning
The MIPI display designed for LattePanda 1st genernation is not compatible with the eDP display connector design on the Alpha and Delta. This compatibility issue is caused by different CPU architectures and positionings of components.
Installation Steps
Warning
Make sure to connect the display before you turn on your LattePanda. Also make sure that the cable is installed correctly before turning the power on. Failure to follow these instructions below may cause a short-circuit and damage the LattePanda or display.
- Make sure the LattePanda is powered off and the power supply cable is disconnected.
- Open the touch panel latch on the LattePanda board.
- Align the touch panel cable with the LattePanda touch panel connector. Make sure the copper cable connection pads face the LattePanda connection pads.
- Connect the touch panel cable.
- Press down on the latch to secure the cable.
Streaming Cable
Please check the docs for the streaming cable here: Getting Started - Streaming Cable