RP2040 Programming - Micropython
Preparation
If you are familiar with Python, MicroPython is the preferred choice for programming and controlling the RP2040 MCU, as it greatly simplifies the development process.
This section demonstrates how to use the RP2040 with MicroPython via the Thonny IDE. Follow these steps:
- Upload the MicroPython firmware to the RP2040.
The onboard RP2040 is pre-flashed with the RPi Pico MicroPython firmware. You can skip this step if the RP2040 has not been programmed with other software.
If the firmware was overwritten by another programming IDE, download the latest firmware from the official MicroPython website and re-flash it. Refer to the Uploading new Firmware to RP2040 section, copy the downloaded .uf2 file to the RP2040's drive.
- Download and install an IDE that supports MicroPython.
For example: Thonny
Upload & Run Code
In this section, we will run a simple blink program to make LED25 continuously flash. LED25 is the blue indicator light located in the upper right corner of the front shield.
-
Open the Thonny IDE.
-
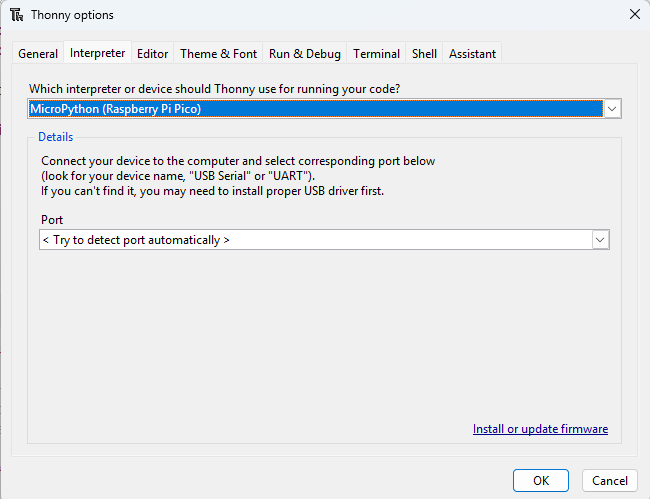
Navigate to: Tools -> Interpreter. Select
MicroPython(Raspberry Pi Pico)as the interpreter.
- Write the blink code in the IDE.

from machine import Pin
import time

led = Pin(25, Pin.OUT)

while True:
    led.on()
    time.sleep(1)
    led.off()
    time.sleep(1)
- Click
Saveand chooseRaspberry Pi Picoas the destination. Name the Filemain.py.Using this filename allows the RP2040 to execute the code automatically upon power-on or after a hard reset.

- Click
Runor press the RST button. The blue LED on the top of the Iota board will begin flashing on and off.
Language Reference
Quick reference for the RP2040